Install Elixir and the Phoenix Framework
Recently we did a hacking week in our office. In the backend we decided to explore the Elixir (opens new window) programming language and the Phoenix Framework (opens new window). In this post I want to install Elixir and setup Phoenix in order to explore them in the next couple of articles. Let's go! 🚀
# What is Elixir?
Quote from the website:
Elixir is a dynamic, functional language for building scalable and maintainable applications. Elixir leverages the Erlang VM, known for running low-latency, distributed, and fault-tolerant systems. Elixir is successfully used in web development, embedded software, data ingestion, and multimedia processing, across a wide range of industries.
I don't have any experience at this point with the language and I think I should not try to explain the concepts of it until I have a better understanding of Elixir and Erlang - that's just how it is 🤷♂️
My starting point however in order to learn elixir will probably be the getting started guide (opens new window) in their documentation.
# What is the Phoenix Framework?
Phoenix is a Framework for the Elixir language - much like Laravel (opens new window) for Php (opens new window) - and provides you a basic application structure and lot's of tools and helper. That's why it is a nice starting point to start my journey.
# Installing Elixir
You can install the elixir language directly on your system, or you can use the official docker containers. We will take a short look at both of it.
# Directly
The installation (opens new window) is rather simple and strait forward, so you should not have problems with it 😉
# install the apt repository (ppa)
wget https://packages.erlang-solutions.com/erlang-solutions_2.0_all.deb && sudo dpkg -i erlang-solutions_2.0_all.deb
# update your package lists
sudo apt update
# install elixir and the esl-erlang
sudo apt install esl-erlang elixir
# Docker
In order to use the docker setup you need to have docker installed. If you haven't done so yet, you can checkout this article in order to do so.
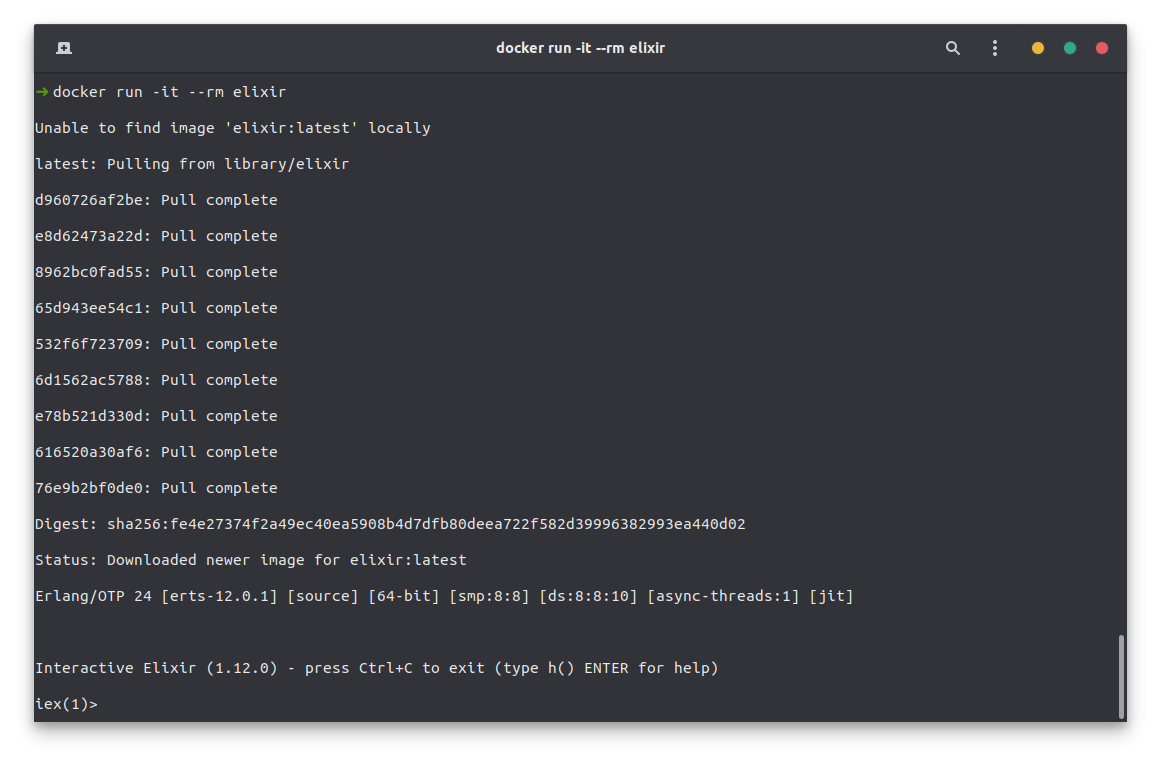
Once you have docker installed, you can run the following to execute pull and execute the elixir docker (opens new window) container.
docker run -it --rm elixir
This might take some time but once it is done you should find your self in an active Elixir shell session (iex (opens new window)) session.
If you need to access the docker container itself, you can use the following to access it through a bash terminal.
docker run -it --rm elixir bash
# Different Versions
If you need to manage multiple Elixir versions, then you might want to check out the available elixir version managers (opens new window).
# Check Installation of Erlang and Elixir
Whatever installation method you choose, once done you should check if Elixir is available to you now. To do yo you can check the elixir version.
elixir --version
This will show some information about elixir and the environment it was build for.

# Setup Phoenix Framework
Once we have installed Elixir we can setup the Phoenix Framework (opens new window).
# Install Hex Package Manager
Hex (opens new window) is a package manager for the Erlang ecosystem that we can use to setup Phoenix. If you have installed Hex already, this command will simply update Hex to the latest version.
mix local.hex
# Install Phoenix Application Generator
Phoenix provides an application generator that we can install using Hex.
mix archive.install hex phx_new
# Installing NodeJS (optional)
Phoenix is using webpack (opens new window) to compile the assets of your application like Javascript and CSS, so if you plan on building a frontend for your application you will need have node installed. I recommend you use nvm to do so.
# Setup a Database
Phoenix comes pre-configured for PostgreSQL (opens new window). If you want to change this to something else, you can use the --database option to do so. Phoenix is using the Ecto (opens new window) package to manage the communicate with the database, so there should be no real differences for you.
For example, I am more familiar with MySQL (opens new window). That's why I could use the following to start a new phoenix project.
mix phoenix.new my-app --database mysql
For the sake of this tutorial however I'm going to use PostgreSQL (opens new window). To install it on ubuntu, you can simply run the following.
sudo apt install postgresql postgresql-contrib
You can reach your postgres server with the following. It will execute the postgres client psql as the user postgres of your system - yes, postgres created a new user on your system 😉
sudo -u postgres psql
In order for Phoenix (actually the Ecto package) to access the database we need to set a password for the postgres user, because per default postgres is not using passwords - I need to wrap my head around it too 😅
So to give the postgres user a password, you need to access the server as the postgres user.
sudo -u postgres psql
Then you can change it's password.
\password postgres
You can exit with exit or \q.
# inotify-tools
If you plan on using the live reloading feature while developing your frontend, you will need to install the inotify-tools (opens new window).
For ubuntu the installation is rather simple. Just run the following.
sudo apt install inotify-tools
# Installation Done!
Puh! That was quite a lot. But once we have our environment prepared, we can start the real journey!
Almost everything we have discussed so far is available in the Phoenix Framework installation guide (opens new window).
# Setup a Phoenix Application
After preparing our environment for erlang, elixir and the phoenix framework, we can actually start setting up our own phoenix application. In order to do so we will use the following command.
# replace my_app with your application name
#   and the path with the path to the parent
#   directory for your application
# the path is optional
mix phx.new my_app ~/codes/
# No Frontend
If your application will not have a frontend, you can pass the --no-webpack flag so it is skipping the frontend setup.
mix phx.new my_app --no-webpack
# No Database
If your application will not have a database at all, you can pass the --no-ecto flag that will skip the database setup.
mix phx.new my_app --no-ecto
# Proceed with the Phoenix Setup
After creating a new application, you will be prompted a list of tasks to perform.
We are almost there! The following steps are missing:

    $ cd my_app
    $ cd assets && npm install && node node_modules/webpack/bin/webpack.js --mode development

Then configure your database in config/dev.exs and run:

    $ mix ecto.create

Start your Phoenix app with:

    $ mix phx.server

You can also run your app inside IEx (Interactive Elixir) as:

    $ iex -S mix phx.server
Basically you can just follow these so I don't have to explain more on them 😉
If you encounter problems, while running
npm installit might be because you are missingpython. You can install it throughsudo apt install python. The dependency comes through thenode-sassnpm package.
After running mix phx.server you can reach your phoenix instance through localhost:4000.
# A Note on Mix
Much like Composer (opens new window) for PHP (opens new window) there is Mix (opens new window) for Phenix (opens new window). As you have seen we use it quite a lot when working with Phoenix. So in order to work efficient with the framework at hand you should check out the many tasks that can be executed through it 👉 Phoenix Specific Mix Tasks (opens new window).
# Done 🚀
And that's basically it, you have installed Erlang and Elixir and are ready to proceed with your Phoenix Framework application 🥳
You can check out more about it in the Phoenix Framework documentation (opens new window).
